Monday, August 30, 2010

The Mask - Part 2

Now I have this big lump of tinfoil, duct tape, and fiberglass resin. What to do now? Well, I guess I need to see and breath. Eye holes cut. Nose cut out and reformed. Oddly enough, it now looks like a wrestling mask. Crap.

I used this image of a bust that a short lived company made of Destro as my source. I then took what I had learned from PaperCrafting, and folder card stock over the mask, using it as a form, and the card stock to build up the features. The lips for the mask were a challenge. How do you make cardstock roll smoothly. You don't. Instead I took a piece of cotton rope I had for a dog leash, cut it to length and taped it in place. Instant lips. It worked pretty well. I used electrical tape to secure the cardstock, which may not have been the best idea. When I later tried to cover the card stock and tape with resin, it didn't seem to want to adhere to the electrical tape. Either they don't like each other, or my mix of resin was not right. Either way it did eventually get several coats of resin. I don't have any pictures of the resin part, because it is messy and I didn't want to accidentally screw up my camera.


After the resin had dried, I noticed there were still some rough areas that needed attention. I could keep trying to smooth it out, or bring in my dear old friend Mr. Bondo. Some bondo and sanding and its looking pretty good.

This is when I start to run out of time. I still need to fix the back, join the two halves, and paint. About now, there are maybe 20 or so days until Dragon*Con. This going to be rough.

Tuesday, August 24, 2010

Costume Repair Kit

According to everything I have read, you should take a costume repair kit with you to conventions. Makes sense, especially if you are flying to one. Only thing is though, costume repair kits were never intended for redneck geek costumes. For example, I can't take paint and fiberglass resin with me and use it in the hotel. Well, I guess I could, but I may want to go back to that hotel one day.
So, now I have to build the redneck geek costume repair kit. So far the kit contains:
A small sewing kit (needles, threads, etc)
5 different kinds of tape (scotch, duct, painters, electrical, chrome)
Safety pins
2 kinds of glue (Instant Crazy Glue, Elmers)
Silver touch up paint and brush
Sharpies (black, red, silver)
Zip ties (large and small)
2 sided sticky velcro
Roll velcro
Replacement decals
Cutting tools (scissors, exacto, razor knife)
Velcro zip ties

Hopefully all this can get us through the weekend. I would ideally like to include a dremel tool and attachments. Along with fiberglass and spray paint, but again, I think the hotel may frown on that. Not sure though, I may have to ask.

Friday, August 20, 2010

The Mask

The mask...the mask...that #*%*&#() mask. What in the world was I thinking about trying to make a full head mask by myself. I've never done anything like this before. This is totally new territory.

I thought about casting one in latex. Make a plaster mold of my head then poor a latex mask from that. Couple of problems. This is expensive. This is dangerous. And latex ALWAYS looks like latex. A rubber mask is a rubber mask. This is supposed to be made of metal not rubber. So that is out.

I thought about making one out of aluminum. I did cast aluminum in college so I have some experience with that. Still though, it would require a mold of my head in a substance that could be burned away by the molten aluminum. Maybe next year.

I found a full mask of Destro for sell on eBay and have seen other people with them. This could work, until I saw the price. $250. For just the mask. Nope. Going to have to make one myself. Somehow.

Now when I was making the papercraft guns, I learned a lot about how to mold with paper and use fiberglass resin to "freeze" it and basically turn it to plastic. So, that would work. Plastic is hard and can look like metal when painted right. Unfortunately, there are no papercraft patterns for making a full head mask. But I didn't give up.

I did find a way to make a full head mask yourself. I don't want to say where I found this technique, but even gimps can have a good idea from time to time.

To make the mask:
Step 1 - have someone wrap your head in aluminum foil. Foil is a good substance for this. It's flexible, but will hold shape well. This lets features like eyes, nose, ears and mouth to be marked, but doesn't provide a perfect mold.

Step 2 - have the same person that wrapped you head in foil now wrap your foil wrapped head in duct tape. This is the real trick to it. This will basically freeze the foil wrap in place and give the whole mask a little more substance. Note: Be sure the person tears the strips of duct tape BEFORE putting the tape on your head. That tearing sound is loud.


The Straws are so I can breathe.

Step 3 - cut the mask off your head. Either with one cut up the back or a cut up each side. This is where I made a mistake that took me months to find.

Step 4 - take the removed mask and use fiberglass resin on the inside. You'll do the outside too, but later. This coat on the inside is simply for strength. Best to do it early too so the fumes will have time to fade before you have to wear it.

The remaining steps involve creating the features on the front of the mask. Applying the resin to the front. Fixing the back half in my case and then reattaching the two halves. How bad could this be?

Wednesday, August 18, 2010

STTNG

One of the MANY events at Dragon*Con is a world record attempt. They are trying to get the most people ever photographed all wearing Star Trek uniforms.
Melinda saw this and we HAVE to do it. Joy. I'm excited about it, but this means that there is yet another costume for me to fix. *sigh*
I've always said if I was going to do a Star Trek uniform I'd do the uniform from The Wrath of Khan. I love those uniforms. You can buy some pre-made versions for about $200 each. I could try to sew them, but I don't have time to find the pattern, material, order the pins and insignia and actually sew the things. What to do? Costume.com that's what. We ordered two Paramount licensed uniform costumes. The quality is OK, but what do you expect for a "costume". It works though. We will be participating in the world record attempt.


My command red shirt (remember this is the next gen, red shirts don't die) and Melinda's science blue.

Destro DC Costume

OK, now on to Destro.

Destro has several pieces:
Boots
Leather pants
That red and black jacket
Ruby necklace
Arm gauntlets

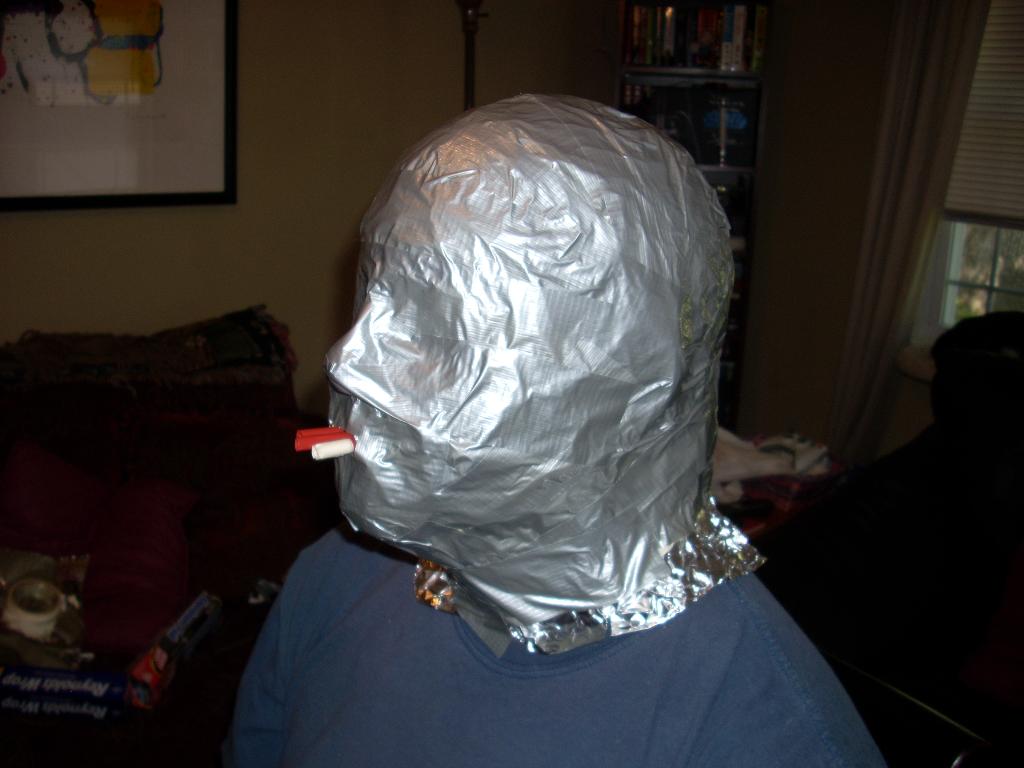
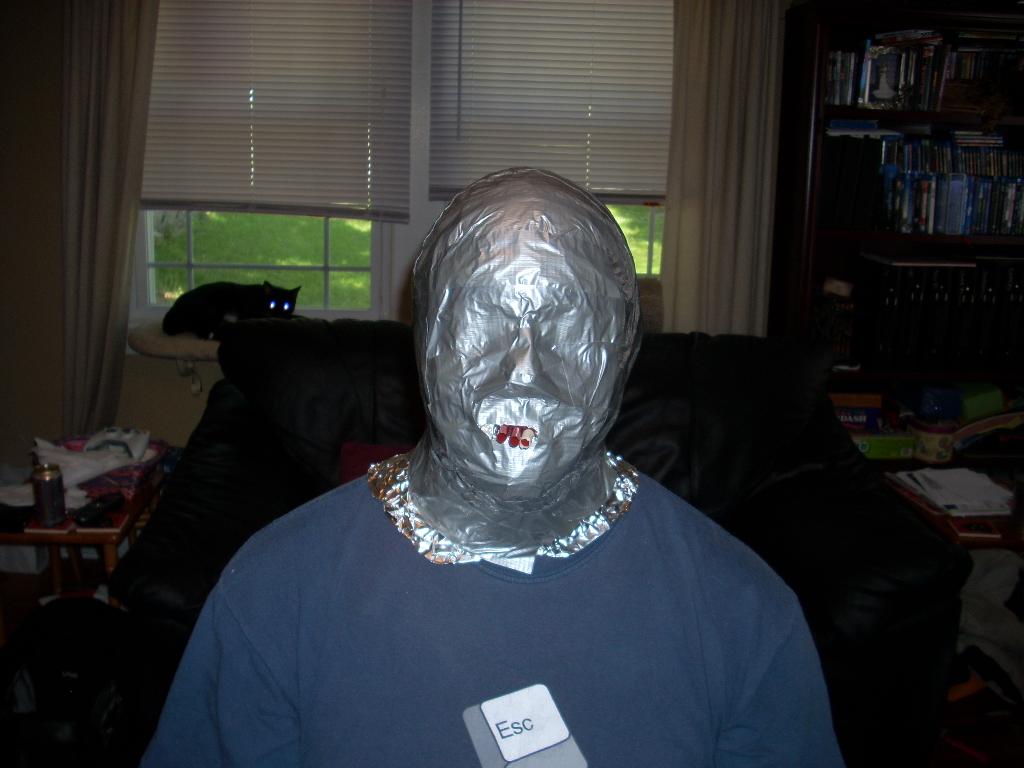
Oh, yeah, and that darn mask. The mask is going to be the topic of several blog posts, simply because it is so darn hard to make. Here I am going to look at the parts that aren't the mask.

Boots. Not just any combat boots will do. These need to be special, and comfortable. Destro is a Scottish Laird after all, and you know he has style. Just look at that jacket! I spent quite a while looking over different boots. Doc Martens were my first choice, but honestly, they seem to have gotten lame in my old age. Then it hit me. Thanks to The Devils Panties, I had learned about New Rock Boots. Handmade Spanish and Italian leather boots. If you know me, you know I am a shoe snob, so these fit right in. It took a while, but I found the perfect pair. They look great with the pants and oh, are they comfortable. I just need to wear them a little more to break them in. I did wear them on a recent work trip to Herndon. They are surprisingly TSA friendly and it was a nice little secret wearing a pair of sh!t kickers in the office.

Pants. So, this was during the time where I was really doubting if I could actually sew. I had many failures with Melinda's costume, so I chickened out and took the pants project to my Mom. Oh, why didn't I just go out and buy a pair of leather pants? Have you ever tried to look for leather pants in the summer time? I could find them at bike shops, but they would have Harley Davidson or other logos all over them. Plus they are expensive. I could buy a lot of vinyl material for the cost of one pair of pants. They turned out great after some tailoring. The best comment was when my Mom first showed them to me "Crap! Is my butt that BIG!?" Apparently it is.

Jacket. After the first fitting of the pants, I spent some time looking online for a black leather jacket that I could add that red collar too. I wasn't having a lot of luck. I had found a few, but they were a couple of hundred bucks each, and I kept getting this nagging thing about keeping the cost down. So, I had a lot of material left over from the pants and I could either keep the material around and keep moving it from place to place, or try one more time to sew. This time a jacket. I really had nothing to lose. If it worked, I had a jacket. If it didn't, I didn't have to keep up with all the material. I took an old costume shirt to use as a basic pattern (arm holes are NOT straight). Cut out the pieces and started sewing and customizing. I updated the jacket a little, but kept the black and red. I like how it turned out. An updated look that keeps the heart of the old school jacket.

See, I kept the red collar. The pin is one that I found and really liked. I think it goes great on the jacket.

Ruby necklace. I have some ideas for this one and it may or may not make it to the final cut. I'm personally not that big on the old pimp medallion anyway.

Arm gauntlets. These unfortunately got scrapped due to time and I didn't think they would work with the redesign on the jacket. I did make the rockets and grenades and I love the grenades, so they may make the costume in some way. I took three racket balls, cut a hole in the top, inserted a piece of PVC pipe and cut to length. The add a piece of card stock for the pin, paint red and poof, you have grenades.


It's now August 18th. I've got 15 days to Dragon*Con. Melinda's costume is done. Mine is 90%. That mask is just kicking my butt, but I've got too much invested in it to give up now. I WILL make it one way or another.

The Baroness Costuming

The Baroness. This will be fun.

The Baroness wears glasses normally, so no big deal there for Melinda. Just have to come up with the costume. Now, I will admit, I know how to sew. Both my parents taught me. We've been needing a sewing machine for years, and now I have a good excuse to buy one. It has been years since I used one, but how hard could it be? (those words still haunt me)

After months of trial and error, lots of scrapped fabric, and many frayed nerves. I gave up on her costume. Making it that is, and we set out on a quest to buy the pieces and put them together.
Pieces needed :
Black top -- needs to be able to either be painted or have a decal of the Cobra logo attached.
Black corset -- going to be tricky to find the right one
Black Pants -- shouldn't be too hard right?
Black boots -- already owned.
Black wig -- easy
Weapons -- Airsoft and Nerf and a lot of paint

The clothes needed to look shiny. Something to resemble vinyl or armor.

The top came to an Under Armor long sleeve shirt. We were looking at these anyway to wear for comfort under the costumes. This one just gets to come outside the costume. I got the Cobra logo as a vinyl decal, and believe it or not, the sucker actually stuck to the shirt!

The pants we found at a store and they have a leather look too them and a really funky cut. I did take them to my Mom to have the tailored (I was still recovering from my total loss of sewing ability).

The corset Melinda found that through Amazon.com of all places. It is a black leather corset and works perfectly.


The weapons were fun to work out. I originally tried making papercraft weapons, just because it was different and fun, but soon realized that I would be spending way too much time to get them just right. So, we got Airsoft pistols for their realism and then I repainted them to add more personality. I did leave the blaze orange ends. It's technically required by law and I don't want to mess with the Atlanta PD walking around looking like we're armed to the teeth.


This will be going in the thigh holster we have for her. The orange tip is still there, just under tape.


This is the Nerf Long Strike, after a paint job. Melinda will be carrying this in order to snipe any Joes that may happen to be around. There is also an ammo belt that straps around her leg.

Honestly, it took us from about March until August to get everything together, thought out, and assembled. Now, admittedly, I was working on my Destro costume at the same time.

There will be more pictures of the complete costume, likely on facebook, when DC gets here.

Costuming for Dragon*Con

So, Dragon*Con and costumes. What to do? Who to be? Well, they have to have glasses or at least make glasses work. I'm a 4-eyes and so is Melin. After a while, we settled on G.I. Joe characters, and not just any, but two of Cobra's elite bad guys. The Baroness and Destro.


With the costumes, there were two roads to take:
A perfect reproduction of the costume
A personal re-interpretation of the costume

I chose path two. A little less traveled and a lot more fun. We looked at all the different versions of our characters that had come and gone over the years and then decided on the look we wanted for our version of them.